DIY Rainbow Gaytime

Last year I was lucky enough to visit Australia and experience the joy that is the Golden Gaytime. For the less fortunate, it’s a toffee and vanilla flavoured ice cream coated in chocolate and biscuit pieces. In the UK we have Feast which is similar but tastes of chocolate and sadness — the Feast can’t hold a candle to the wonderous Gaytime.

Anyway, the Gaytime has something of a cult following. Jesse McElroy, a Gaytime superfan has previously successfully campaigned to bring Gaytime tubs and a Gaytime Cornetto to market. For Sydney Mardi Gras he released a photo of a Rainbow Gaytime prototype which got everyone excited but it doesn’t seem to have materialised.

So I thought I’d have a bash at it myself. You might know that Australia is currently in the process of arranging a plebiscite on equal marriage. It’s something I feel strongly about even though I can’t vote so this is one way in which I can express love for my Aussie friends who are currently working incredibly hard to make sure the right thing gets done.

The process

McElroy didn’t release any details of his prototype so I had to experiment. My first thought was to try and use food colouring to dye crushed up biscuits, but that just made a soggy mess.

Then it hit me — rather than trying to dye pre-baked biscuits, what if I baked the biscuits with the colour and then crushed them? So I whipped up a prototype batch and was happy to find that it worked perfectly.

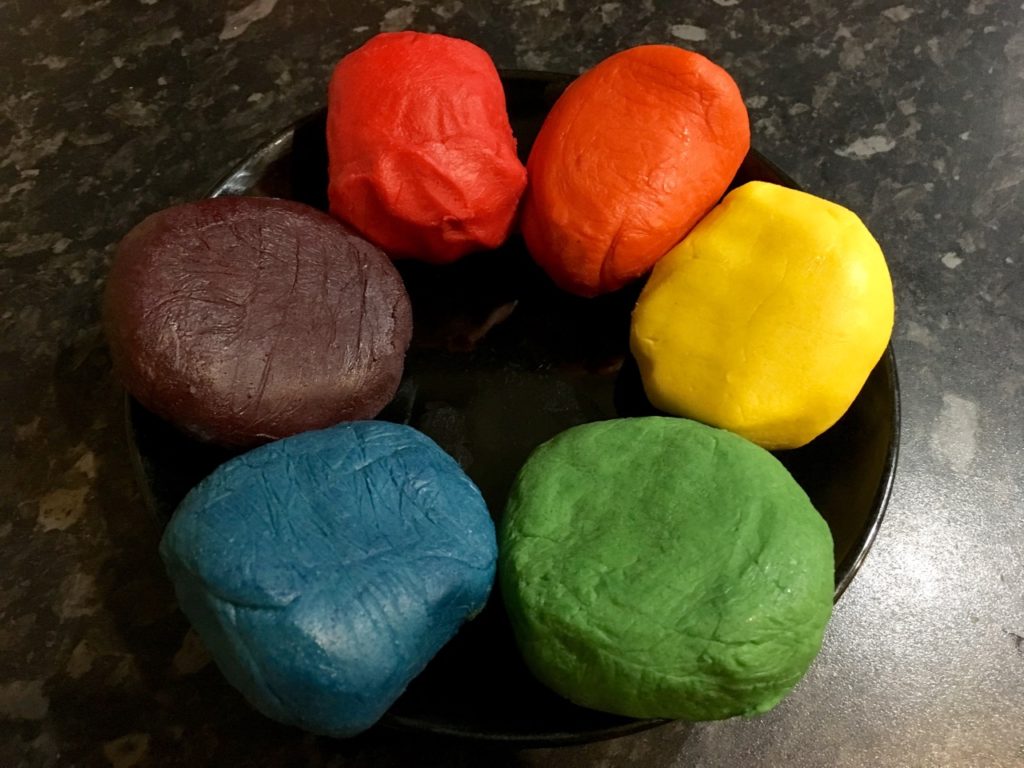
So here’s how it works — make up a simple shortbread recipe, split the dough into six and add the colourings. It’s important you use highly-concentrated bake-stable colourings to get the bright colours. I used Sugarflair. You also don’t need to buy all six colours — you can just use red, blue and yellow, mixing them as needed to get the orange, green and purple. I also added some concentrated toffee flavouring for the authentic Gaytime flavour.

Rainbow shortbread dough ready to shape and bake

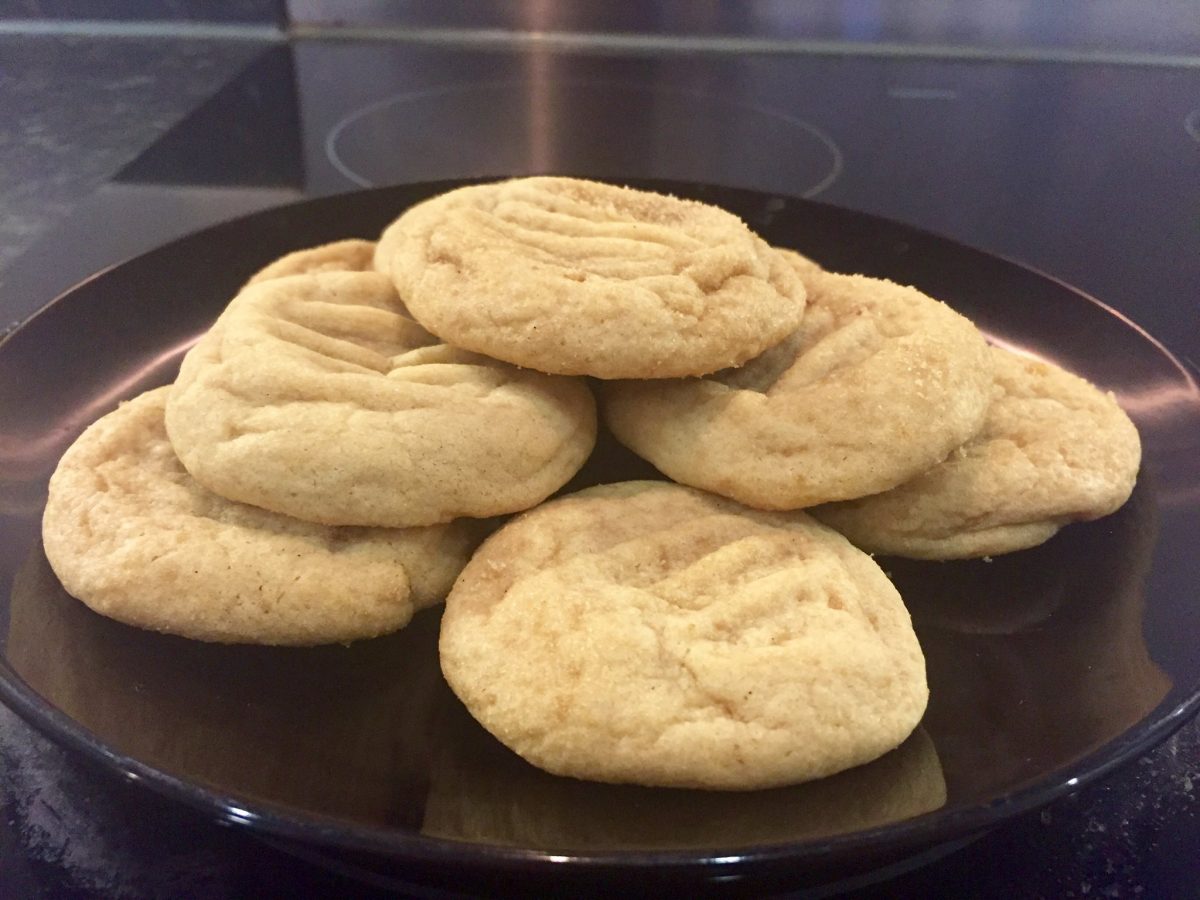
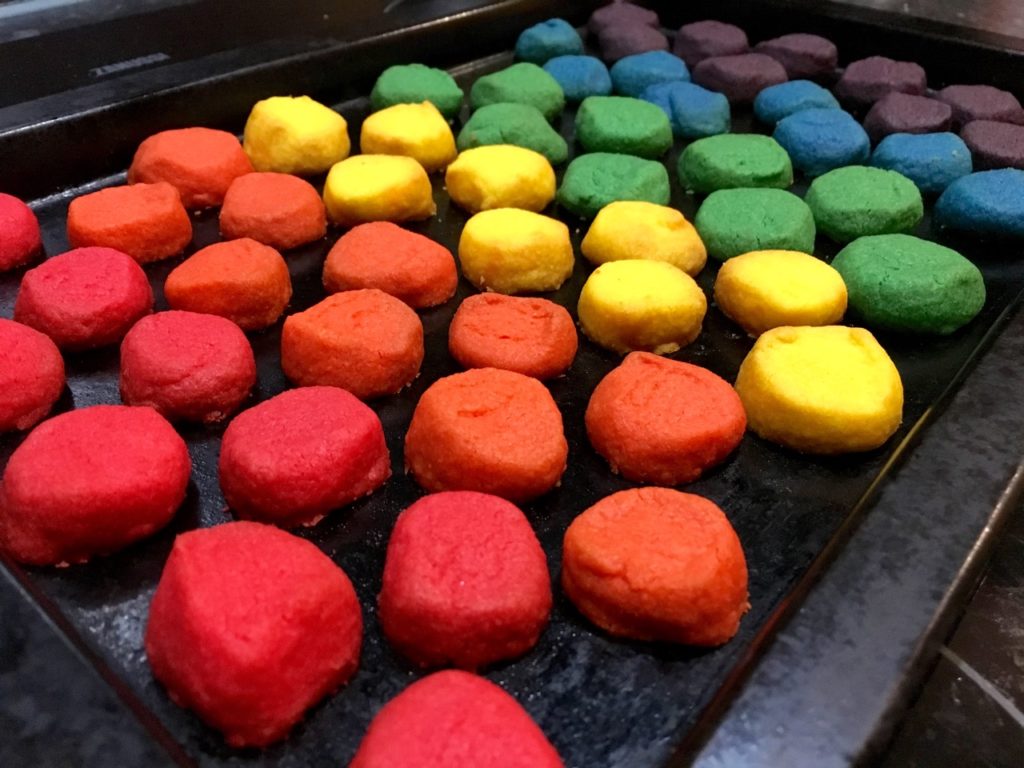
Then you just need to bake some biscuits ready to be crushed. It sounds harsh, but these biscuits were born for a greater purpose. You can bake extra shortbreads and eat them as-is. They look great on their own. One tip is to err on the side of underbaking them to avoid them burning and compromising the colour. This is particularly important for the yellow and blue batches.

Rainbow shortbreads fresh out of the oven

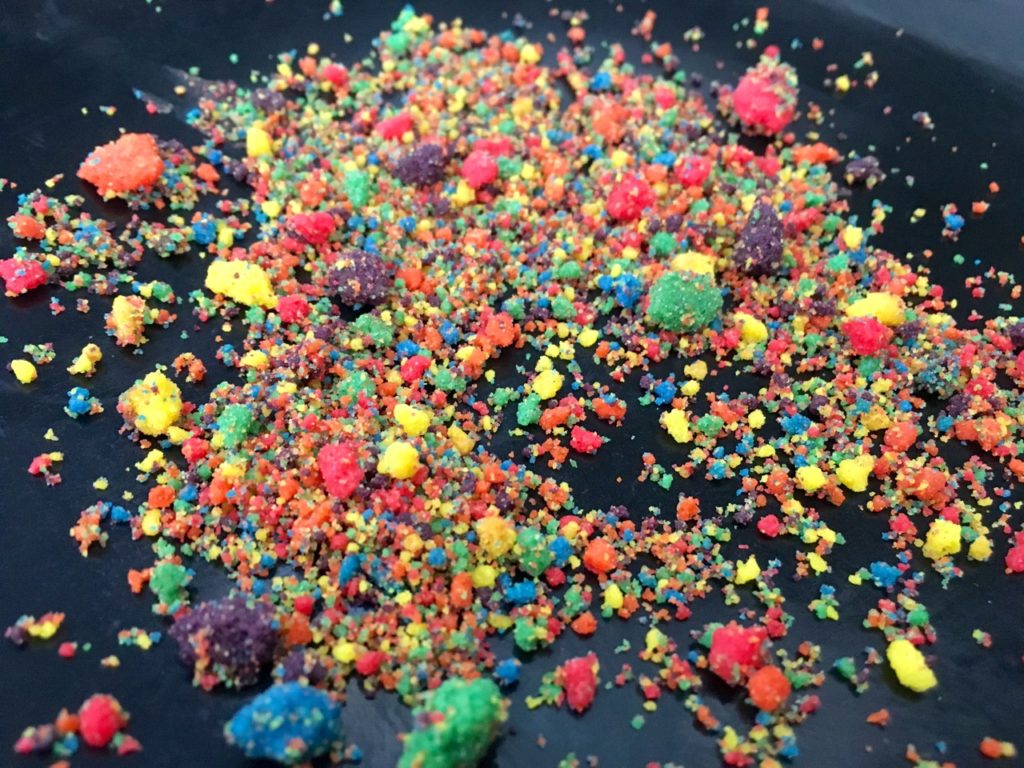
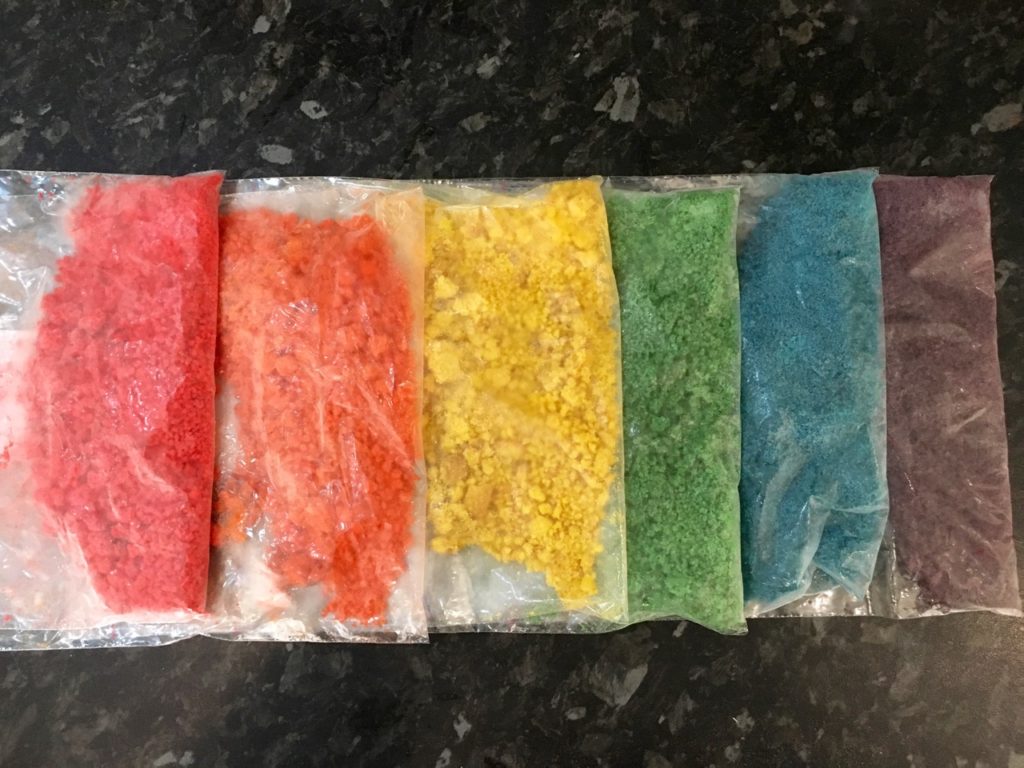
When crushing the biscuits you’ll want to be thorough and get the crumbs as small as possible for best coverage. Large crumbs look good but it’s hard to get them to stick. Put the crumbs in bags and freeze them, spreading them out to avoid clumping. When it’s done you should have something like this:

Rainbow crumbs ready to go

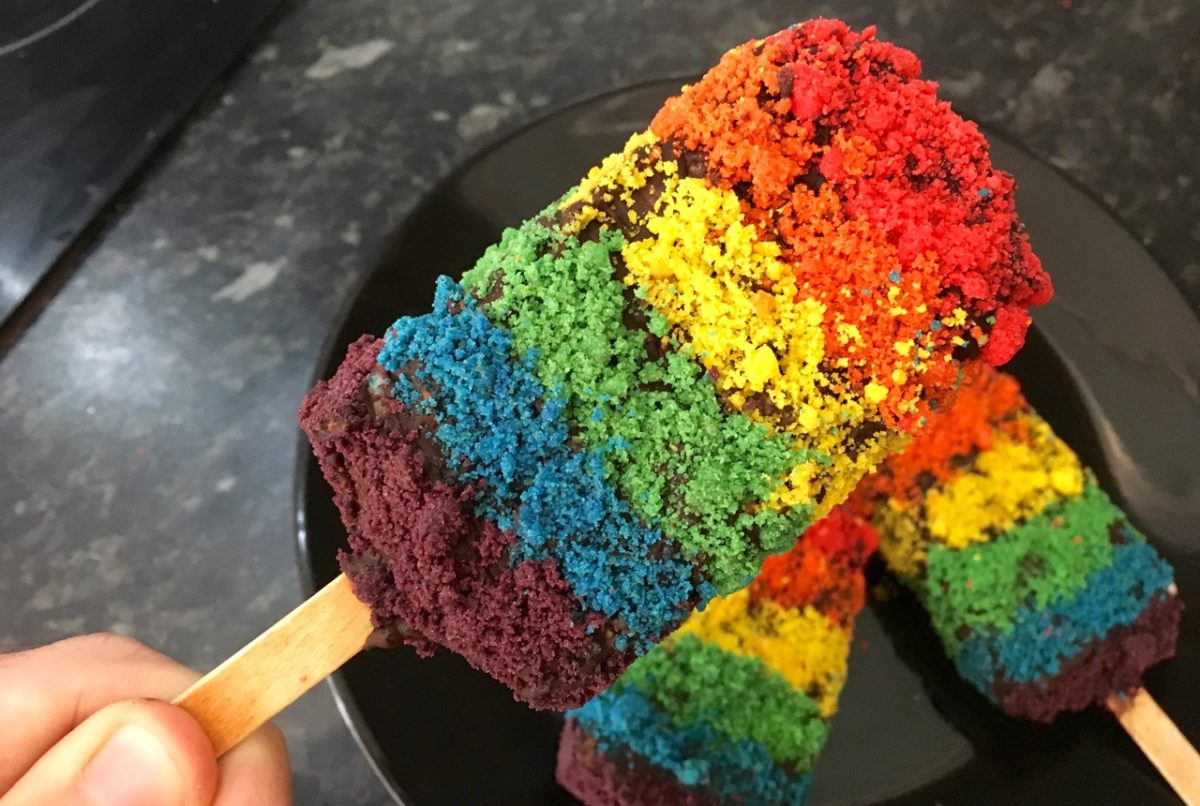
Then it’s just a case of applying the crumbs to the Gaytime. I did that by melting some chocolate on a bain-marie and then painting it onto the ice cream before applying the crumbs. You have to work quickly as the cold ice cream will solidify the chocolate so I found it easiest to do it in small sections rather than trying to do a whole band at once. Another reason to go quickly is the that the ice cream doesn’t melt and leak out of the chocolate, but this is a messy job any way so be prepared to get covered in chocolate, ice cream and colourful crumbs. I found some in my ear just now, not even joking.

So the final result will look something like this — maybe not as photogenic as the prototype but still fabulous. You’ll probably want to pop them back in the freezer in plastic bags so they don’t just melt everywhere, but whatever floats your boat.

Finished Rainbow Gaytimes

The Recipe

Essentially this is just a shortbread recipe with extra steps, but anyway. The quantities here will give you heaps of biscuits so you should have extra that you can use as-is. If you aren’t bothered you can probably halve the quantities.

You should have a heap of leftover rainbow crumbs which you could use as a topping for cakes, ice creams, chuck them in any leftover chocolate to make a bark or just eat them with a spoon like I did.

Leftover rainbow crumbs

Shortbread recipe adapted from BBC Food.

Bartlesville Cream Pie

Despite the name this gooey, fudgey and supremely chocolatey slice of bliss is actually a cake rather than a pie, but as it’s an original creation by Ree Drummond I’ll give her a pass. This time.

Bartlesville Cream Pie is a layer of smooth salted caramel pudding sandwiched between two layers of rich chocolate cake and smothered in a decadent cream ganache.

If you have a chocoholic in your life, this will definitely get you in their good books!

Making your own caramel for the pudding might seem daunting but it just needs a little care and attention to make sure it doesn’t burn. If you haven’t had American-style pudding before you’re in for a treat, especially if you’re a salted caramel fan.


S’mores Cookie Bar Bites

It’s officially summer, which means barbecues, festivals and camping — whatever the weather!

For Americans, that means s’mores. These little pieces of magic combine three simple ingredients — biscuit, marshmallow and chocolate — and turn them into gooey, sticky, delectable treats that’ll have you coming back time and again for “some more” — hence the name!

These cookie bar bites are like an extra-gooey blondie and are adapted from a recipe on Sally’s Baking Addiction, one of my absolute favourite baking sites. They’re simple to make and guaranteed to get a reaction — take them to the next outdoor event you go to and see your friends’ faces light up as they discover the joy of s’mores!

Slow-Cooked Balsamic Honey Chicken & Vegetables

Yeah, I know, this one’s a bit different. It was just so good I had to share it. Don’t judge me.

I love my slow cooker. It’s like a witches’ cauldron that takes simple ingredients and turns them into dishes that are far more than the sum of their parts.

This recipe is a great example of the slow cooker’s magical powers. During the cooking process the vinegar mellows in flavour and mingles with the juices from the meat and veggies to create a mildly sweet sauce.

You could also modify this recipe to leave out the meat if you just want the veggies to pair with something else.

Modified from a recipe by Tasty.

Quick & Easy S’mores Pie

S’mores are better-known in the US than the UK, but I’m on a mission to educate my friends one cookie, brownie or slice of pie at a time.

Biscuit, chocolate and marshmallow — what’s not to like?

This pie came about because I had a couple of jars worth of Fluff in the cupboard that I wanted to use up, so I paired it with a butter chocolate ganache and a buttery biscuit base for a simple but effective treat.

I’ve used a base recipe from the awesome Sally’s Baking Addiction here but if you have a preferred biscuit base recipe any will do — it’s the flavour that’s important.

Dark Chocolate Mint Crunch Cookies

I love baking for many reasons, but my favourite is being able to share the results.

To be able to give someone a little bag full of delicious treats that you’ve made yourself with them in mind is so satisfying and adds a very personal touch.

These cookies were designed for my mum — she loves dark chocolate and mint so a combination of the two is an easy win.

This recipe is adapted from one I found on Two Peas & Their Pod — they have loads of great recipes so I highly recommend you check them out.

Egg, Bacon & Sausage Pie

What to do when you’re left to your own devices on a Sunday morning, faced with leftover eggs, bacon and sausage that need using? Bake a pie, of course!

This recipe was inspired by a Hairy Bikers one and makes a really filling pie with lots of flavour and a great crumbly crust. This was my first savoury pie — believe it or not — and I was really pleased with how it came out.

Obviously what sausages you use will have a big effect on the flavour — worth experimenting but definitely get the best ones you can afford, preferably from a butcher as the results will be so much better.

Dark Chocolate Salted Caramel Oreo Pie

The title of this one is pretty much a list of things that are good on their own anyway, but combine them and you’ve really got something.

This recipe is adapted from one on Kevin & Amanda’s blog that was sent to me as a very subtle hint ahead of a friend coming over for dinner.

The good news is that it’s easy to make — just a few ingredients put together in three main stages — crust, caramel and ganache.

The result is decadently rich with a crumbly crust, gooey caramel and smooth ganache, sure to please even the sweetest tooth!

Canadian Maple Cookies

After vanilla, one of my favourite flavours is maple syrup so a cookie with both is a no-brainer for me.

Like the difference between vanilla extract and vanilla essence, there is a huge gulf between real maple syrup and the cheap “maple flavoured syrup” on the supermarket shelves, so you have to check before you buy. The real stuff is more expensive, but worth it.

The real stuff also comes in various grades, from light to dark, with the corresponding level of flavour.

For this recipe I used a whole bottle of Buckwud — a medium grade syrup — best to buy two bottles though as you’ll want to try it with bacon, ice cream and anything else you can think of!

This recipe is adapted from a Food.com user submission.